Table of Contents

Goal
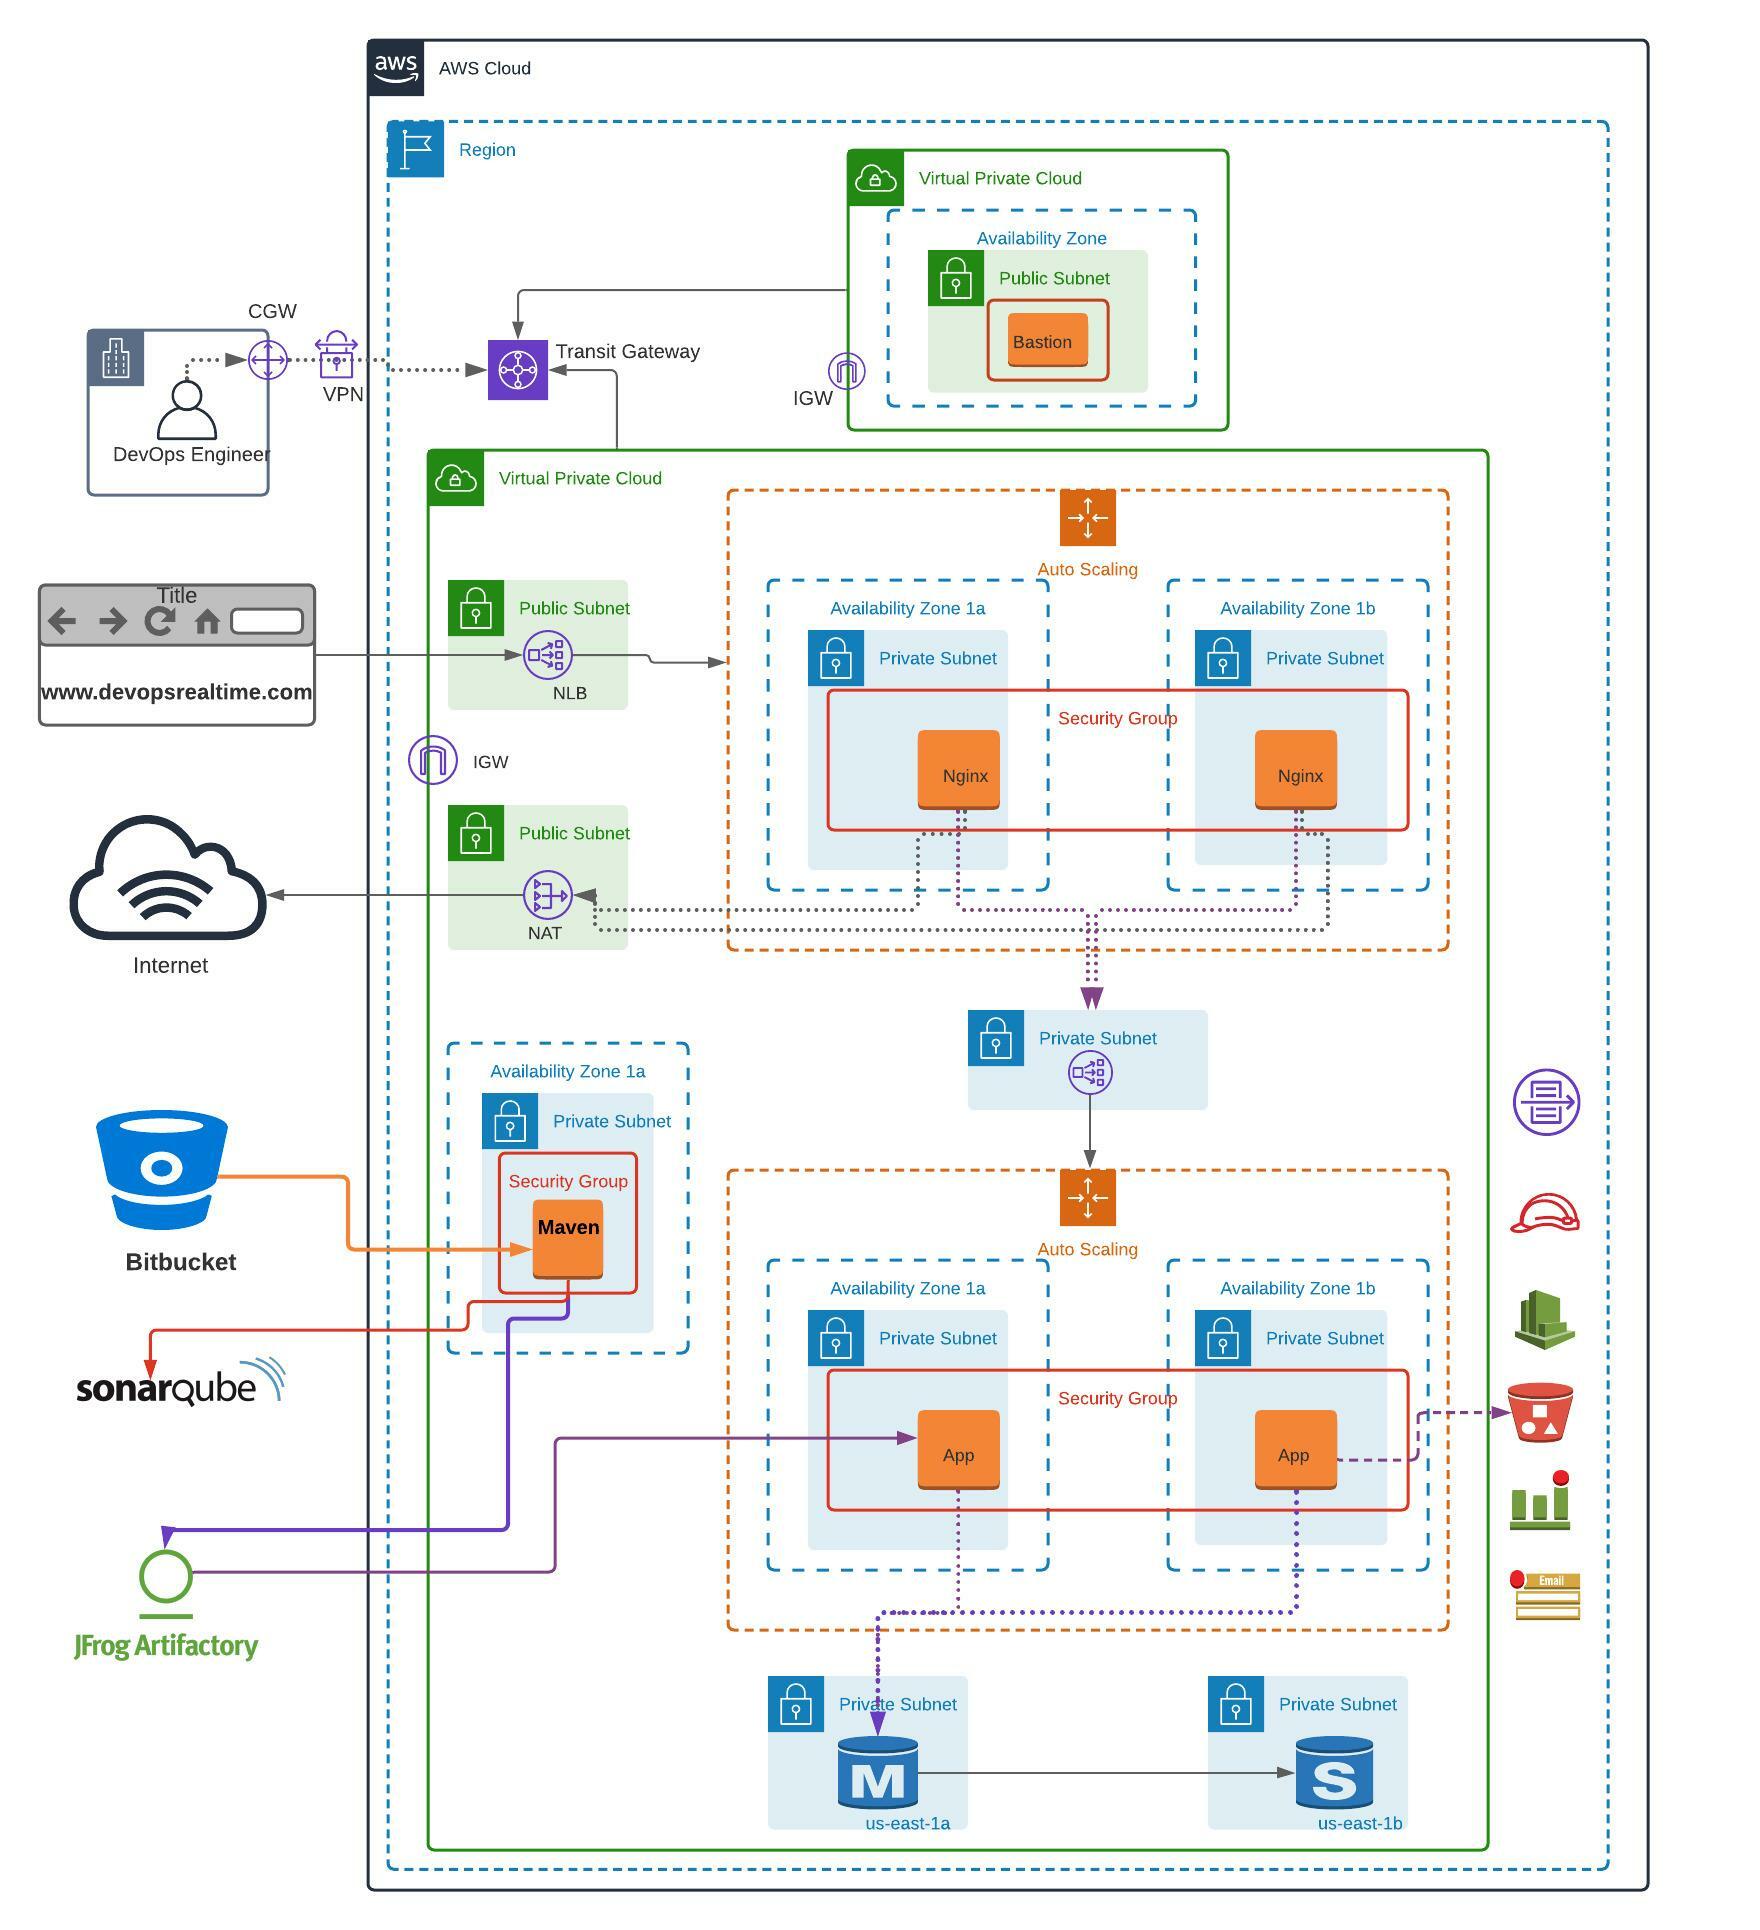
Goal of this project is to deploy scalable, highly available and secured Java application on 3-tier architecture and provide application access to the end users from public internet.
Pre-Requisites
- Create AWS Free Tier account
- Create Bitbucket account and create repository to keep Java source code.
- Migrate Java Source Code to your own Bitbucket repository – Refer
- Create account in Sonarcloud.
- Create account in Jfrog cloud.
Pre-Deployment
- Create Global AMI
- AWS CLI
- Cloudwatch agent
- Install AWS SSM agent
- Create Golden AMI using Global AMI for Nginx application
- Install Nginx
- Push custom memory metrics to Cloudwatch.
- Create Golden AMI using Global AMI for Apache Tomcat application
- Install Apache Tomcat
- Configure Tomcat as Systemd service
- Install JDK 11
- Push custom memory metrics to Cloudwatch.
- Create Golden AMI using Global AMI for Apache Maven Build Tool
- Install Apache Maven
- Install Git
- Install JDK 11
- Update Maven Home to the system PATH environment variable
VPC Deployment
Deploy AWS Infrastructure resources as shown in the above architecture.
VPC (Network Setup)
- Build VPC network ( 192.168.0.0/16 ) for Bastion Host deployment as per the architecture shown above.
- Build VPC network ( 172.32.0.0/16 ) for deploying Highly Available and Auto Scalable application servers as per the architecture shown above.
- Create NAT Gateway in Public Subnet and update Private Subnet associated Route Table accordingly to route the default traffic to NAT for outbound internet connection.
- Create Transit Gateway and associate both VPCs to the Transit Gateway for private communication.
- Create Internet Gateway for each VPC and update Public Subnet associated Route Table accordingly to route the default traffic to IGW for inbound/outbound internet connection.
Bastion
- Deploy Bastion Host in the Public Subnet with EIP associated.
- Create Security Group allowing port 22 from public internet
Maven (Build)
- Create EC2 instance using Maven Golden AMI
- Clone Bitbucket repository to VSCode and update the pom.xml with Sonar and JFROG deployment details.
- Add settings.xml file to the root folder of the repository with the JFROG credentials and JFROG repo to resolve the dependencies.
- Update application.properties file with JDBC connection string to authenticate with MySQL.
- Push the code changes to feature branch of Bitbucket repository
- Raise Pull Request to approve the PR and Merge the changes to Master branch.
- Login to EC2 instance and clone the Bitbucket repository
- Build the source code using maven arguments “-s settings.xml”
- Integrate Maven build with Sonar Cloud and generate analysis dashboard with default Quality Gate profile.
3-Tier Architecture
Database (RDS)
- Deploy Multi-AZ MySQL RDS instance into private subnets
- Create Security Group allowing port 3306 from App instances and from Bastion Host.
Tomcat (Backend)
- Create private facing Network Load Balancer and Target Group.
- Create Launch Configuration with below configuration.
- Tomcat Golden AMI
- User Data to deploy .war artifact from JFROG into webapps folder.
- Security Group allowing Port 22 from Bastion Host and Port 8080 from private NLB.
- Create Auto Scaling Group
Nginx (Frontend)
- Create public facing Network Load Balancer and Target Group.
- Create Launch Configuration with below configuration
- Nginx Golden AMI
- User Data to update proxy_pass rules in nginx.conf file and reload nginx service.
- Security Group allowing Port 22 from Bastion Host and Port 80 from Public NLB.
- Create Auto Scaling Group
Application Deployment
- Artifact deployment taken care by User Data script during Application tier EC2 instance launch process.
- Login to MySQL database from Application Server using MySQL CLI client and create database and table schema to store the user login data (Instructions are update in README.md file in the Bitbucket repo)
Post-Deployment
- Configure Cronjob to push the Tomcat Application log data to S3 bucket and also rotate the log data to remove the log data on the server after the data pushed to S3 Bucket.
- Configure Cloudwatch alarms to send E-Mail notification when database connections are more than 100 threshold.
Validation
- Verify you as an administrator able to login to EC2 instances from session manager & from Bastion Host.
- Verify if you as an end user able to access application from public internet browser.
© Edwiki Trainings – Click HERE If you are interested to learn more on Cloud & DevOps stack.


10 comments
super
Completed this assignment. I’ll put together my solution for anyone interested
Yes it would be helpful.
my solution is documented in this folder
“Java App deployment with Sonar and Jfrog on 3Tier Assignment5”
in my github repo here:
https://github.com/yemisi/Valaxytraining.git
thank yemi
yes it will be hekpful
This is really a thorough project. I really like the way it is designed from the ground up. really boosted my confidence after facing many challenges!
could you please help me understand WHY we have to Configure Tomcat as A Systemd service? what it’ll do? in which all scenarios DO we need to CONFIGURE like this?
If tomcat is added to the systemd service then its easy to manage the service status using “service or systemctl commands”. Also can enable auto start option to start the tomcat service automatically after the system reboot using “systemctl enable tomcat” command.
please can you provide video link of your projects so that it will be helpful to understand