
This article listed the steps to follow to setup Kubernetes cluster using below methods in AWS cloud.
kops
Create bootstrap server
Bootstrap server can be your local system or an EC2 instance created in AWS. Bootstrap server is only needed to setup the K8s cluster by running the kops commands to initialize the cluster.
- Install AWS CLI
- pip insall awscli
- Install Kubectl
- curl -LO “https://dl.k8s.io/release/$(curl -L -s https://dl.k8s.io/release/stable.txt)/bin/linux/amd64/kubectl”
- chmod +x kubectl
- mv kubectl /usr/local/bin/kubectl
- Install Kops
- curl -Lo kops https://github.com/kubernetes/kops/releases/download/$(curl -s https://api.github.com/repos/kubernetes/kops/releases/latest | grep tag_name | cut -d ‘”‘ -f 4)/kops-linux-amd64
- chmod +x kops
- mv kops /usr/local/bin/kops
Create IAM Role
Create IAM Role and attach the role to bootstrap server. IAM Role must have below policies attached.
- AmazonEC2FullAccess
- AmazonRoute53FullAccess
- AmazonS3FullAccess
- IAMFullAccess
- AmazonVPCFullAccess
- AmazonEventBridgeFullAccess
- AmazonSQSFullAccess
Configure Route53
Custom domain is required to setup Kubernetes cluster using Kops, so that Kops can create required resource records in that domain in Route 53. example – “dptcluster.devopsrealtime.com”
Gossip is alternate option if you want to deploy a cluster without custom domain in Route 53. To use gossip-based DNS, configure the cluster domain name to end with .k8s.local. example – “dptcluster.k8s.local”
Create Cluster State Storage (S3 Bucket)
To store the state of your cluster, and the representation of your cluster, we need to create a dedicated S3 bucket for kops to use. This bucket will become the source of truth for our cluster configuration.
- Login to AWS console and create S3 bucket. example bucket – “dpt-k8s-state-store”
Setup SSH Keys
Create SSH Keys by running “#ssh-keygen -t rsa”, which creates keys in default location $HOME/.ssh
Create cluster configuration
Congratulations!! You have setup all prerequisites on the bootstrap server.
We’re ready to start creating our k8s cluster! setup below environment variables to start creating cluster configuration.
Custom Domain
- export NAME=dptcluster.devopsrealtime.com
- export KOPS_STATE_STORE=s3://dpt-k8s-state-store
Gossip Domain
- export NAME=dptcluster.k8s.local
- export KOPS_STATE_STORE=s3://dpt-k8s-state-store
Run below command to create cluster configuration
- kops create cluster –zones=us-east-1a ${NAME}
Modify cluster configuration(Optional)
Kops created default cluster configuration and now you can edit the configuration if needed to customize it by running below command
- kops edit cluster ${NAME}
Build cluster
Run below command to build the cluster with the configuration that was created in previous step. Cluster build takes while and hence wait for longer until the cluster is ready for you.
- kops update cluster ${NAME} –yes –admin
Note that, the configuration for your cluster was automatically generated and written to $HOME/.kube/config for you! If config was not created then can export the config using below command
- kops export kubecfg –admin
Validate cluster
Below commands help you to check your cluster status, If cluster is not ready wait for few more minutes and check again!!
- kops validate cluster
- kubectl get nodes
Delete cluster
IMPORTANT! to note that cluster resources created by Kops are not in Free Tier, hence you may need to destroy resources once you are done with the setup.
You can preview all the AWS resources that will be destroyed when the cluster is deleted by issuing the following command.
- kops delete cluster –name ${NAME}
Below command to delete resources
- kops delete cluster –name ${NAME} –yes
eksctl
EKS is the AWS managed kubernetes cluster and can setup EKS quickly using eksctl CLI utility.
Create bootstrap server
Bootstrap server can be your local system or an EC2 instance created in AWS. Bootstrap server is only needed to setup the K8s cluster by running the kops commands to initialize the cluster.
- Install AWS CLI
- pip insall awscli
- Install Kubectl
- curl -LO “https://dl.k8s.io/release/$(curl -L -s https://dl.k8s.io/release/stable.txt)/bin/linux/amd64/kubectl”
- chmod +x kubectl
- mv kubectl /usr/local/bin/kubectl
- Install eksctl
- curl –silent –location “https://github.com/weaveworks/eksctl/releases/latest/download/eksctl_$(uname -s)_amd64.tar.gz” | tar xz -C /tmp
- mv /tmp/eksctl /usr/local/bin
Create IAM Role
Create IAM Role and attach the role to bootstrap server. IAM Role must have below policies attached.
- AWSCloudFormationFullAccess
- AmazonEC2FullAccess
- EKSDescribeAccess ( Policy Here )
- IAMFullAccess
Find the complete guide on minimum policies required to setup k8s using eksctl
Create cluster
- eksctl create cluster –region=us-west-2 –name dptcluster –zones=us-east-1a,us-east-1b,us-east-1d
Validate cluster
- eksctl get cluster
- kubectl get nodes
Delete cluster
- eksctl delete cluster –region=us-west-2 –name dptcluster
Note: eksctl by default creates “m5.large” instances in us-west-2 region.
kubeadm
Pre-Requisites
- Create EC2 instances on AWS cloud to configure K8s master and worker nodes.
- RPM based Linux EC2 instances (centos, Redhat, Amazon Linux etc..)
- Minimum 2 CPU and 2 GB memory
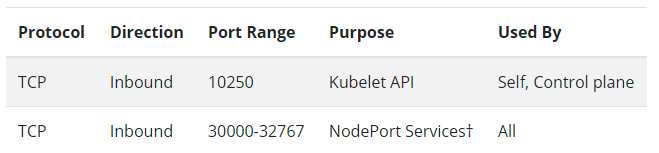
- Network between the cluster nodes, ensure below ports are allowed to master and worker-nodes.
- Master Node
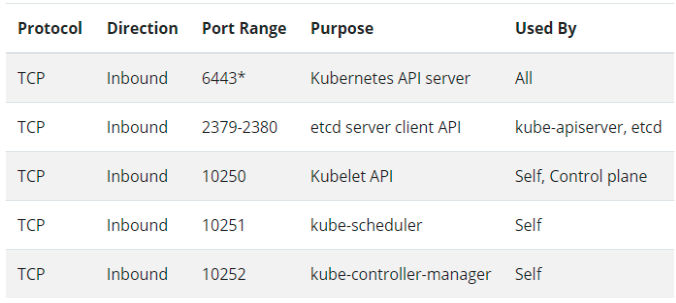
- Worker Node
- Master Node
- Disable swap
Configure K8s Master(Control Plane)
Configure Kubernetes Repo
Run below command to add Kubernetes Repo to the yum repo.
[kubernetes] name=Kubernetes
baseurl=https://packages.cloud.google.com/yum/repos/kubernetes-el7-\$basearch
enabled=1
gpgcheck=1
repo_gpgcheck=1
gpgkey=https://packages.cloud.google.com/yum/doc/yum-key.gpg https://packages.cloud.google.com/yum/doc/rpm-package-key.gpg
exclude=kubelet kubeadm kubectl
EOF
Install Packages
Install below packages on Master Kubernetes server
- docker: Container Runtime
- kubeadm: Command to bootstrap the cluster.
- kubelet: Service running on all nodes to managing starting pods and containers.
- kubectl: Command utility to interact with K8s cluster API server.
Enable Services to start after reboot
Run below commands to enable docker and kubelet services to start automatically after reboot of the master.
- chkconfig docker on
- chkconfig kubelet on
Start Docker services
Run below command to start Docker runtime services
- service docker start
Setup K8s Master(Control Plane)
Configure CRI driver for Docker
Run below command to configure CRI driver for Docker Run time
{
“exec-opts”: [“native.cgroupdriver=systemd”],
“log-driver”: “json-file”,
“log-opts”: {
“max-size”: “100m”
},
“storage-driver”: “overlay2”
}
EOF
Initialize K8s Master
Run below command on master node to initialize the kubernetes cluster.
** cidr is the user choice network range to deploy k8s network
** Note the unique token and hash generated by makster which you can use later to join the nodes.
example: kubeadm join 172.31.77.56:6443 –token r5k7h2.rzlkqshp8flvwuvs –discovery-token-ca-cert-hash sha256:5c17ac5e4649ce9d9314c4591430ef27b620a6e72f7066b8279b8b4dec891773
Configure kubectl client
Run below commands to seup KUBECONFIG to authenticate k8s api server from kubectl
sudo cp -i /etc/kubernetes/admin.conf $HOME/.kube/config
sudo chown $(id -u):$(id -g) $HOME/.kube/config
Apply POD network ( calico )
Run below command to setup Calico network for POD communication.
- kubectl apply -f https://docs.projectcalico.org/v3.14/manifests/calico.yaml
Validate cluster
Run below commands to validate cluster configuration and master availability.
- kubectl config view
- kubectl get nodes
Setup Worker Nodes
Join worker node
Run below command on each worker node to join the node to the control plane
- kubectl config view
- kubectl get nodes
Delete cluster
You would have to cleanup all resources manually from AWS cloud.
© Edwiki Trainings – Click HERE If you are interested to learn more on Cloud & DevOps stack.


1 comment
Thank you PR, NIcely written ,easy to understand and implement.